Animation Documentation
Style Consistency
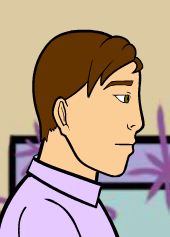
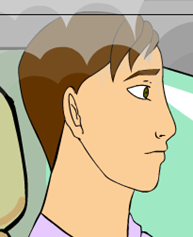
Style consistency is important. When working on new assets, make sure to reference both the HitAndRun and Larceny scenes for player references. Facial and body proportions are very key to getting across that the player is looking at the same character throughout the scenes.
 |  |
|---|---|
| avatar’s side profile in the larceny scenario | avatar’s side profile in the hit-and-run scenario |
Communication
Conveying progress is very important via discord. It’s quite common to feel like you’re going in the correct direction with the animation, only to find out you committed to a simple mistake hours back. It’s vital that you stay up to date by making quicktime screen recordings every step of the way to communicate what direction your work is going in. Dropping a quick 10 recording in the asset review channel on discord and @-ing supervisors might seem annoying, but it’s very important in making sure you and the team are on the same page. You don’t have to be doing this constantly, but it helps to do it any time you are unsure or have just finished a rough you need feedback on.
Uploading Work
It’s very important to make sure work is being uploaded as you go. I found it helpful to drop my files into drive once or twice a day, and to upload to Git once I made large amounts of progress. However you decide to do it, you want to make absolutely sure your progress is accessible to other team members in the event that your laptop breaks or you’re away when people need to access what you have worked on.The Git may seem confusing at first, but after awhile it’s pretty simple. After downloading the desktop GitHub application, it will make a folder for you in the documents section on your computer. It automatically downloads the necessary files for you, so from there you can easily access them. Files saved or changed in these folders won’t actually change for the team until you “push” them on Git. Opening the app will present you with all the files you’ve changed, and gives you the opportunity to name those changes before committing and then pushing to the server.
Color Accuracy
When editing assets and keeping to the color palette, double check whenever you use the color drop tool. It isn’t uncommon for the color dropper to change a single digit of the swatch you chose, making it so color consistency issues occur. In the event that this happens, you can use the “Find And Replace” tool in Animate to simply replace this mistaken color with the correct one.

Eyedrop the incorrect color into the “find” slot, then use the palletization guide provided by the team to enter the correct swatch code in the “replace” slot. The tool will, as the name implies, let you find and replace any colors that match the first code with colors that match the second. It significantly shaves time off in the event that this mistake happens. The colors for each character will look very weird while working on it, but know they are just placeholders.
Trello Cards
Trello is a website that the team uses often in the background. It allows any member to put up cards with jobs tagged for certain people. They can be as simple as letting you know some pixels are missing on a frame, but this makes them important to check often. They’re very useful when you feel like you are out of work to do, as often team members will have tossed up a card or two for you without you realizing. We use a system where cards will be placed in “Things To Do” when they’re freshly added. Once you have time to work on it, click and drag the card over to the “Doing” section and then to the “Done” section once complete. This is a good way to update the team on your progress without telling everyone every time.
Bitmap
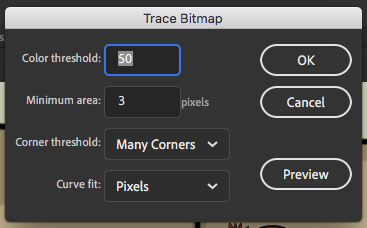
Sometimes you may have to work on background assets for the scene that are more easily created in photoshop or some other program you are familiar with. This is fine, but you must make sure to vectorize the work after importing it to the scene. Works created in photoshop are rasterized images, based on pixels, while those made in animate are vectorized, made with coordinates. In order to convert your image, there’s a handy tool called “Bitmap Trace” under modify > bitmap. These are the particular settings I used when tracing the mall background:

The settings might be confusing, so I’ll run through them quickly. Color Threshold determines the accuracy of the colors being traced, with a number closer to 1 being totally accurate and one closer to 500 being very rough. Be careful not to set it too low, as this may cause it to remain a raster image. Minimum Area is a very important one, as it determines the smallest area that the program will convert. I set mine low as it allowed me to convert tiny details accurately, but this won’t matter that much if you just have large areas to convert. Corner Threshold is a bit complicated, but know that it determines accuracy as well. Many Corners is the high fidelity option, while the other options are either normal or low accuracy. Finally, Curve Fit determines how closely animate follows the curves that create vector colors. You can restrain it to be very tight fitting, pretty loose or pixel accurate.