Features
The main features and pages of the Researcher Console are shown here as numbered example images and corresponding descriptions. You can use these anchor links below to jump to a particular element of the Researcher Console.
Jump to:
- Navigation Pane and Scenario Selection Page
- Assets Page
- Scenario Navigation Bar
- Scenario Workspace
- Preview Scenario Screen
Navigation Pane and Scenario Selection Page
Upon creating an account and logging in, the user of the researcher console is directed to this Scenario selection page shown below, where they can manage different Pleajustice simulation projects.
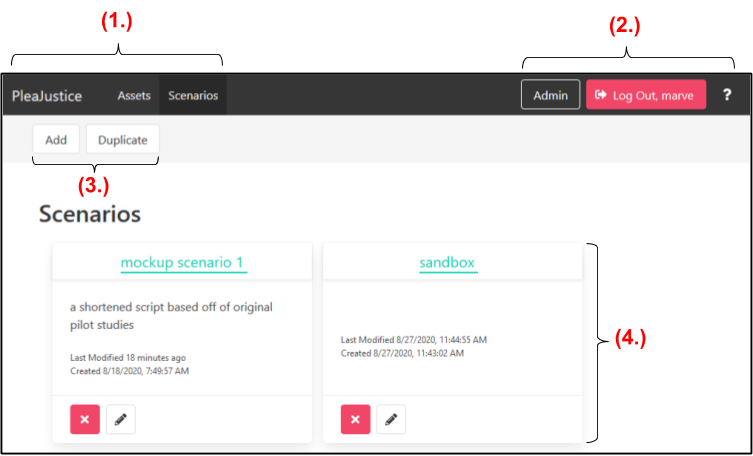
- The top, shaded row is the navigation pane shown on all Researcher Console pages. The left side is used to swap between the Assets and Scenarios pages.
- The right side of the row contains buttons to access the admin console (internal use only), logging out, and the help menu. The help menu shows additional information on the current view the user is on.
- The Add button creates a new, blank scenerio while the Duplicate button allows the user to select an existing scenario to duplicate.
- Here are where individual scenarios are organized. Each separate pane contains a scenario title, description of project, time last edited, and a time created. From this page, users can modify the scenario by clicking on the title, delete the scenario by clicking on the red X, or edit the displayed properties by clicking on the pencil button. Shown in the example image above are two scenarios named “
mockup scenario 1” and “sandbox”.
Assets Page
Assets used for the simulation can be managed on this page. Users will likely have access to all assets featured in the original Pleajustice pilot studies, but will also have the option to upload their own customized assets.

- An Add button is highlighted green at the top of the page for users to upload their own assets, apart from the ones that are preloaded.
- The Filter Asset Type feature shows only assets of a particular type. Users would select a type of asset from the dropdown menu on the top-right of the screen and assets of the selected type would populate the screen.
- This file upload pane that appears when users click the Add button to add an asset. Users would choose a file to upload from their computer, and then select what asset type the file is (Actor, Background, Cache, Clip, Foreground).
- An example of an uploaded asset is shown above, with the asset's name (which is the file’s original name when uploaded), a preview of the file, uploaded date, asset type, and a button to delete the asset.
Scenario Navigation Bar
When editing a Scenario, the features on the toolbar floating on the top of the row can be used to modify the Scenario, conditions, scenes, and other configuration options. The name of the project “sandbox” is located in the top right of the image, shown in the example below.

- This area contains features that are in regards to the properties of the overall project.
- The scene count shows the total number of scenes.
- The Save button saves all changes and configurations made.
- The Options button opens a menu to change the details of the Scenario, such as the Survey URL, or the Scenario Name and Description displayed in the Scenario Selection Page.
- The button containing arrows is a Expand/Collapse All Scenes button, affecting all scenes.
- The Add Condition button creates another condition by replicating the right-most column.
- This area contains features that are in regards to individual scenes.
- The Swap button allows the user to swap two scenes within the same Condition by first selecting one scene, and then selecting the scene the user would like to swap it with.
- The Copy button allows the user to copy a scene by first selecting a scene to be copied and then selecting as many scenes as the user would like to replace.
- The Bind button allows the user to bind the properties of scenes in the same row to forcibly match that of a single scene, by first selecting the scene the user would like replicated and then selecting other scenes to bind to.
- This area contains features that are in regards to finishing and wrapping up the project.
- The console is responsive to unsaved changes so the user is notified if there are any.
- The Preview button generates a workable preview URL of the simulation, that replicates the conditions and their respective scenes. The URL will show the Preview Scenario Screen
- The Publish button pulls a dropdown menu with a
Manual Downloadand aPublish Liveoption. These features need to be manually enabled; please consult with the administrator of the Pleabargains project.
- Manual Download allows you to download all files associated with the scenario’s simulation as a ZIP. Once downloaded, the files can be deployed onto a server independent of the Researcher Console.
- After verifying the user’s login credential, clicking Publish Live will create another entry in the dropdown menu called,
Active Live Link. Qualtrics has a End of Survey feature to allow a survey redirect to a link once the survey is completed.
Scenario Workspace
When editing a scenario, the user is given a workspace to modify conditions (represented as columns) and scenes (represented as individual panes within the row, or frames). The example shown here is simply one condition, one scene frame, and one scene. A blank scene (represented as a scene with a + button and no configurable details) can also used as padding to align scenes across frames, not shown in the example.
- The top row shows all conditions of the scenario, where users can Delete conditions and Add & Remove Tags that are relevant to each particular conditions.
- This is the Scene Frame Name and Unique Scene Count. In this example:

Courtroom1is the name of the scene frame (the particular row).- There are
2unique scenes indicated within this row (only one scene is shown in the example).
- This is the Scene Frame Count, where the example indicates this is the first scene frame.
- Located on the left side of the scene frame are a few buttons that manage the scene frame.
- The uppermost button is a Collapse/Expand button. The scene frame is currently expanded, but would only show the scene frame name and unique scene count when collapsed.
- The middle arrow buttons are Swap Scene Frame buttons. The current example shows only a downward facing arrow, to swap with the scene frame under it (since its the first frame).
- The lowermost button is the Delete Scene Frame button, which deletes the whole row.
- Users can select what type of scene by selecting Dialogue, Clip, or Question. A blank scene can also be used by selecting the Red X and clearing the scene type.
- This space contains fields that the user can select and fill in depending on the scene type selected.
- Dialogue scene types have the dropdown fields Actor, Foreground, and Background that will display the different asset types that are available. Additionally, a text field Script is available in order to render text on the screen during the simulation.
- Clip scene types only have a single dropdown field for Clip asset types.
- Question scene types have the dropdown fields Background and Script like the Dialogue scene type, but also have an additional field Buttons meant to give the user of the simulation a way to answer prompts on the screen via multiple-choice buttons rendered on the screen.
Preview Scenario Screen
Clicking the 👁 ️Preview button from the scenario editing page will direct the user to the screen below. This feature allows the user to demo their own scenarios
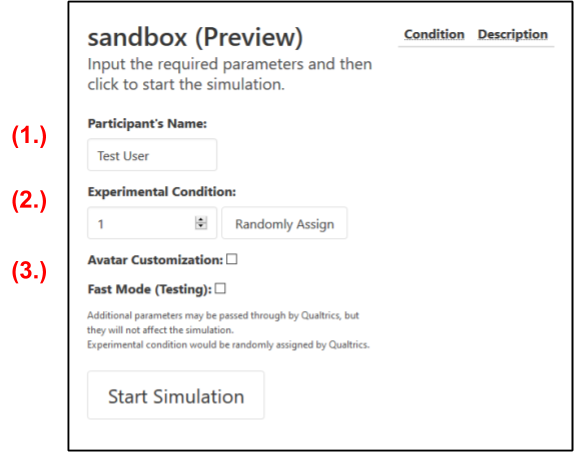
- A test name can be input to refer to the participant’s name in the dialogue within the simulation.
- The user can run the simulation using one of the particular conditions made. Clicking the
Randomly Assignbutton will shuffle the number in the text field to a random available condition. - These are optional fields that the user can check off to append or supplement the simulation.
- The Avatar Customization option would allow the user of the preview to customize the colors and visual attributes of their avatar. This way, scenes that reference the participant’s avatar will adapt to the corresponding configurations made in the customizer. If disabled, these references will simply use default values in place of the personalized avatar values.
- The Fast Mode option would play clips and render dialogue at a much faster speed, typically used for testing purposes.